1. Introduction:
Clustering allows us to run an
application on several parallel servers (a.k.a cluster nodes). The load
is distributed across different servers, and even if any of the servers
fails, the application is still accessible via other cluster nodes.
Clustering is crucial for scalable enterprise applications, as you can
improve performance by simply adding more nodes to the cluster.
2. Why Clustering?
Clustering solutions usually provide:
- Scalability
- High Availability
- Load Balancing
Scalability:
The key question here is, if it takes
time T to fulfill a request, how much time will it take to fulfill N
concurrent requests? The goal is to bring that time as close to T as
possible by increasing the computing resources as the load increases.
Ideally, the solution should allow for scaling both vertically (by
increasing computing resources on the server) and horizontally
(increasing the number of servers) and the scaling should be linear.
High Availability:
The objective here is to provide
failover, so that if one server in the cluster goes down, then other
servers in the cluster should be able to take over -- as transparently
to the end user as possible.
In the servlet engine case, there are two levels of failover capabilities typically provided by clustering solutions:
- Request-level failover
- Session-level failover
Request-level Failover:
If one of the servers in the cluster goes
down, all subsequent requests should get redirected to the remaining
servers in the cluster. In a typical clustering solution, this usually
involves using a heartbeat mechanism to keep track of the server status
and avoiding sending requests to the servers that are not responding.
Session-level Failover:
Since an HTTP client can have a session
that is maintained by the HTTP server, in session level failover, if one
of the servers in the cluster goes down, then some other server in the
cluster should be able to carry on with the sessions that were being
handled by it, with minimal loss of continuity. In a typical clustering
solution, this involves replicating the session data across the cluster
(to one other machine in the cluster, at the least).
Load Balancing:
The objective here is that the solution
should distribute the load among the servers in the cluster to provide
the best possible response time to the end user.
In a typical clustering solution, this
involves use of a load distribution algorithm, like a simple round robin
algorithm or more sophisticated algorithms, that distributes requests
to the servers in the cluster by keeping track of the load and available
resources on the servers.
3. Architecture:
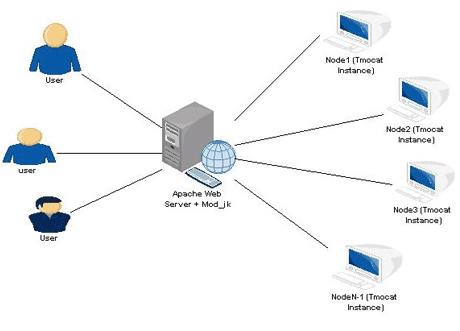 Architecture diagram of Tomcat Load Balancing
4. How to implement solution using Apache Web Server and Mod_Jk:
So, this is what you need to download:- Apache HTTP server 2.2.4 from The Apache HTTP Server Project
- Apache Tomcat 5.5.23 from Apache Tomcat downloads
- Mod JK Tomcat connector from Tomcat connector. Please note: You want to download the binary- click on JK 1.2 Binary Releases --> win32 --> jk-1.2.21 --> mod_jk-apache-2.2.4.so
- Extract the Tomcat zip. Hereafter, the directory you extracted to will be referred to as TOMCAT_HOME
- Test Tomcat to see that it works. Go to TOMCAT_HOME\bin and run startup.bat You may need to add an environment variable called CATALINA_HOME which is set to TOMCAT_HOME in case Tomcat fails to start.
- Open up your browser and access http://localhost:8080/
If you see the default page, then Tomcat Instance 1 is working fine. Shut down Tomcat.
- Make a directory called Tomcat2
- Copy the all directories from the TOMCAT_HOME directory into the tomcat2 directory.
- Open up tomcat2\conf\server.xml in a text editor. We've got to
change the port numbers so that they don't conflict with the first
instance.
<Server port="8005" shutdown="SHUTDOWN"> to
<Server port="8025" shutdown="SHUTDOWN">

<Connector port="8080" maxHttpHeaderSize="8192"... to
<Connector port="8010" maxHttpHeaderSize="8192"...

<Connector port="8009" enableLookups="false"
 redirectPort="8443" protocol="AJP/1.3" /> to
<Connector port="8019" enableLookups="false"
redirectPort="8443" protocol="AJP/1.3" />
Your second tomcat instance is now ready to be used.
Next, let's set up the Apache HTTP Server. It's pretty simple...
- Run the installer you downloaded. The standard install will do.
- Open the Apache Server Monitor and start the web server if it's not already running.
- Point your browser to http://localhost/ to verify that Apache is running on port 80.
- Stop Apache.
Finally, we reach mod JK. Let's set it up
first just to delegate requests to the two Tomcat instances, and we'll
load balance it a bit later.
- Copy the mod_jk-apache-2.2.4.so to the modules directory in your Apache installation.
- Open up httpd.conf in the conf directory of your Apache installation in a text edit, and add the following line at the end of the set of LoadModule statements: LoadModule jk_module modules/mod_jk-apache-2.2.4.so
- Create a file called workers.properies in the conf directory. Add these lines to it:
workers.tomcat_home=C:/apache-tomcat-5.5.23
workers.java_home=C:/jdk1.5.0_07
worker.list=worker1,worker2
worker.worker1.port=8009
worker.worker1.host=localhost
worker.worker1.type=ajp13
worker.worker2.port=8019
worker.worker2.host=localhost
#you can also specify other
#machine address or name
worker.worker2.type=ajp13
This file defines which workers Apache can delegate to. We've listed worker1 and worker 2 to correspond to our two tomcat instances. Remember to set tomcat_home and java_home as well. - Specify the worker properties in httpd.conf:
Add these lines just after the LoadModule definitions-
# Path to workers.properties
JkWorkersFile c:/apache2.2/conf/workers.properties
# Path to jk logs
JkLogFile c:/apache2.2/mod_jk.log
# Jk log level [debug/error/info]
JkLogLevel info
# Jk log format
JkLogStampFormat "[%a %b %d %H:%M:%S %Y] "
# JkOptions for forwarding
JkOptions +ForwardKeySize +ForwardURICompat -ForwardDirectories
# JkRequestLogFormat set the request format
JkRequestLogFormat "%w %V %T"
JkMount /jsp-examples worker1
JkMount /jsp-examples/* worker1
JkMount /tomcat-docs worker2
JkMount /tomcat-docs/* worker2
Defining these tells Apache where to look for definitions of its workers and tells it that any requests for the jsp-examples context should be handed off to the Tomcat instance represented by worker 1, and any requests for tomcat-docs context should be handed off to Tomcat Instance 2, represented by worker 2.Edit the server.xml for Tomcat 1 and Tomcat 2 and add a jvmRoute attribute to the Engine element:<Engine name="Catalina" defaultHost="localhost" jvmRoute="worker1"> for the first instance and <Engine name="Catalina" defaultHost="localhost" jvmRoute="worker2"> for the second.
- Start Tomcat 1 and 2. Start up the Apache webserver. Point your browser to http://localhost/jsp-examples/ and then to http://localhost/tomcat-docs. You should see the respective pages load. To distinguish which Tomcat is serving you the page, the easiest thing to do is edit the index page in the tomcat-docs and jsp-examples of Tomcat 2 and change the title for example. Then you can verify that tomcat-docs is being served only by the second instance.
Apache is now delegating requests to both
Tomcats. But we need to set tomcat for load balancing and for failover
mechanism. If Tomcat 1 is crashed for whatever reason, Apache will
automatically keep delegating to Tomcat 2 so
your application remains accessible.
Load balancing is a simple configuration. First shut down your Tomcat instances and Apache as well.
- Open workers.properties
- Edit it so it looks like this (changed lines in bold)-
workers.tomcat_home=C:/apache-tomcat-5.5.23
workers.java_home=C:/jdk1.5.0_07
#worker.list=worker1,worker2
worker.list=balancer
worker.worker1.port=8009
worker.worker1.host=localhost
worker.worker1.type=ajp13
worker.worker1.lbfactor=1
worker.worker2.port=8019
worker.worker2.host=localhost
worker.worker2.type=ajp13
worker.worker2.lbfactor=1
worker.balancer.type=lb
worker.balancer.balance_workers=worker1,worker2
worker.balancer.method=B
# Specifies whether requests with SESSION ID's
# should be routed back to the same #Tomcat worker.
worker.balancer. sticky_session =True
IWe've changed the worker list to a single worker called balancer, and specified that the worker type of balancer is 'lb' or load balancer. The workers it manages are worker1 and worker2 (these do not need to appear in the workers list). And finally, we set the balance method to 'B' or balance by busy factor. Apache will delegate the next request to the Tomcat instance which is least busy. Please note that there are a couple of options for method- consult the Apache/Tomcat documentation which lists out options for workers properties to help you decide the best method for your type of application.If you want to use session stickyness, you must set different jvmRoute attributes in the Engine element in Tomcat's server.xml. Furthermore the names of the workers which are managed by the balancer have to be equal to the jvmRoute of the Tomcat instance they connect with.x - Open httpd.conf and comment out the previous JkMount directives. Replace them with these:
JkMount /jsp-examples balancer
JkMount /jsp-examples/* balancer
we've just pointed Apache to a single worker- the balancer. - Start up both Tomcats and Apache. Access http://localhost/jsp-examples You will either be served by Tomcat 1 or Tomcat 2. To prove that both are capable of serving, shut down the first instance and refresh your browser. You should be served by instance two.
Conclusions:
This solution provides high scalability,
high availability, and good load balancing capabilities that are
comparable with any other software solution.
No comments:
Post a Comment